What is Visual Regression Testing
Challened by complexities of writing and maintaing E2E tests engineering world is adopting new approaches like visual regression testing. Visual regression testing with modern tooling is almost free in effort of adding it to your project, requires little time to maintain and can serve as an amazing addition to your testing suite.
Visual Regression Testing with Cypress
This guide will cover a tool called Cypress for writing visual regression tests. Cypress apart from everything is an amazing E2E testing tool that allows you to automate your tests to achieve user-like interactions with your frontend.
With Cypress you write scripts in various languages and run tests on different browsers, making it a versatile tool for modern web testing.
To top all of that with Cypress you can as well add really simple visual tests in different parts of your E2E tests. In this guide we will explore running visual tests with Lost Pixel, open source tool that specialises in the visual tests and offers various utilities and helpers to make the developer experience even better.
Who might find this article useful
-
Software Developers: Especially front-end developers or full-stack developers tasked with maintaining the visual consistency of applications and websites.
-
Quality Assurance Engineers: Professionals responsible for testing software to ensure it's bug-free and visually consistent.
-
Product Managers: Those who need to understand the testing process and may be deciding on the tools and processes used in their teams.
-
DevOps Engineers: They are often responsible for setting up continuous integration (CI) environments that might run these visual regression tests.
-
UI/UX Designers: They might be interested in understanding how their designs are being tested for visual consistency.
This guide will go over each step in detail and is also suitable for beginners! No matter what you specialise in - you will be able to setup effortless visual regression tests for your existent or new Cypress test definitions.
Cyrpess setup
Let's clone cypress kitchen-sink setup.
First, we need to install the dependencies and start the application, which in this case is just a plan html + javascript page. Cypress works with all modern frameworks so you could use it with the framework of your choice.
npm install && npm run start
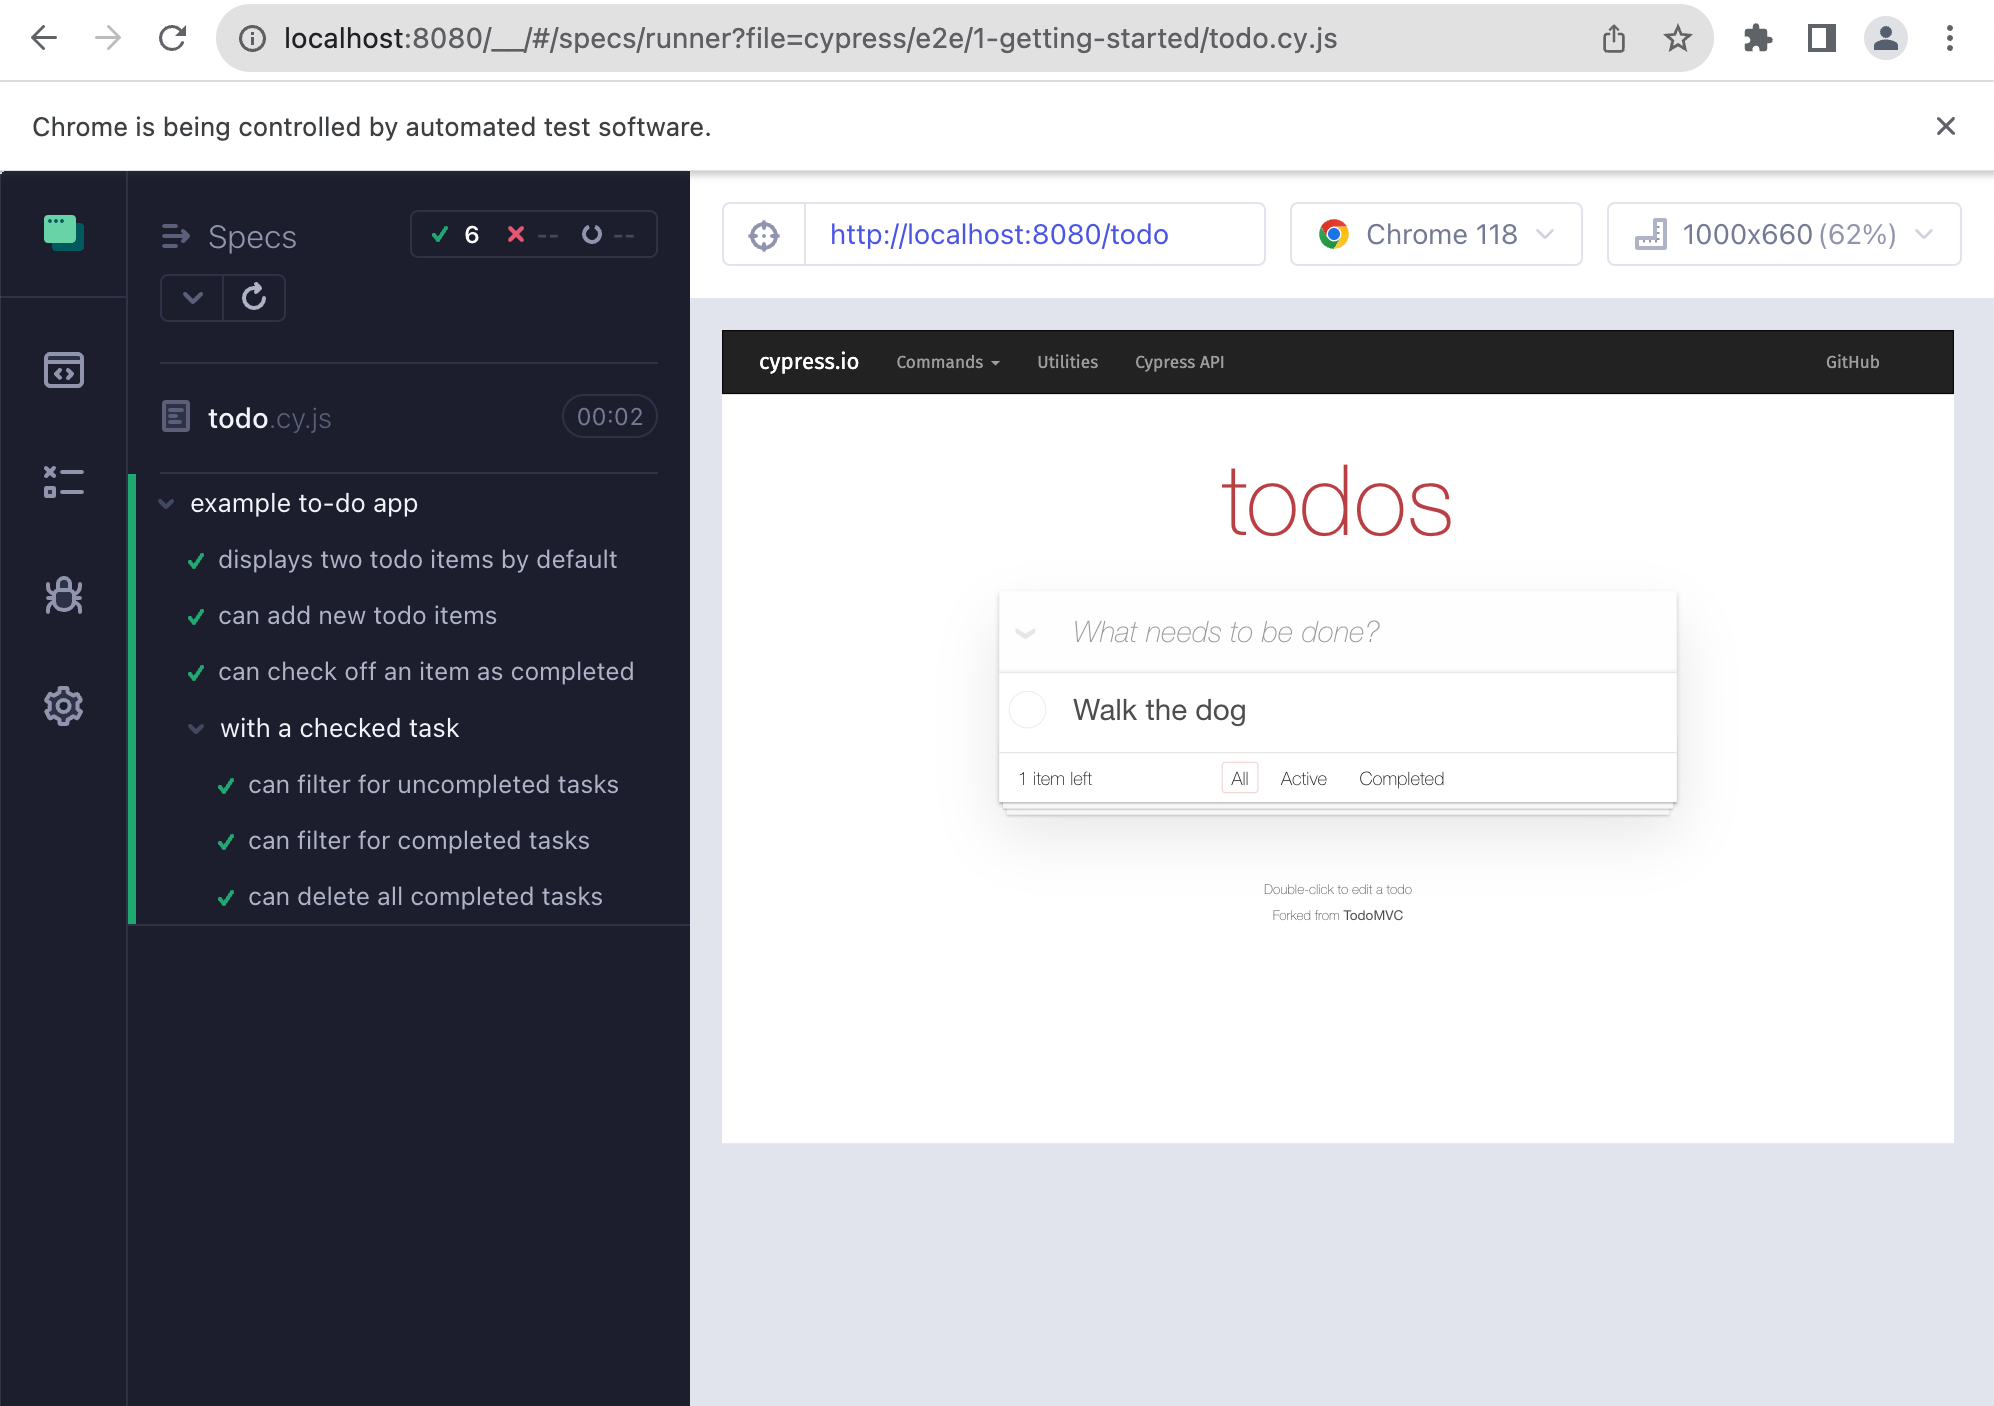
Finally to run the cypress and get some pre-configured tests going we need to run npm run cy:open
That's the interface we are expected to see after choosing E2E tests and Chrome as the test runner:
Lost Pixel setup
Lost Pixel is a holistic visual regression testing tool meaning that it can run with various setups and cover your whole application including visual tests for the components and pages. Lost Pixel can do visual regression tests on the images that you provide to it - it's called custom mode. In this mode you are responsible for making the screenshots and Lost Pixel is taking care about visual regression testing flow.
Let's start by adding lost-pixel as the dependency to our project.
npm install lost-pixel
Next step for us is to add lostpixel.config.ts with the following contents:
import { CustomProjectConfig } from 'lost-pixel';

export const config: CustomProjectConfig = {
 customShots: {
    currentShotsPath: "./cypress/screenshots",
  },
  generateOnly: true,
  failOnDifference: true
};
Here we tell Lost Pixel that we are expecting to get the screenshots to visually test from ./cypress/schreenshots. Luckily cypress provides utilities to make sure that anywhere in our E2E tests.
Let's delete all of the generated advanced cypress tests, we will run this example on the basic todo app.
In the todo.cy.js we will need to add couple of lines of code to actually make the screenshots:
/// <reference types="cypress" />

// Welcome to Cypress!
//
// This spec file contains a variety of sample tests
// for a todo list app that are designed to demonstrate
// the power of writing tests in Cypress.
//
// To learn more about how Cypress works and
// what makes it such an awesome testing tool,
// please read our getting started guide:
// https://on.cypress.io/introduction-to-cypress

describe('example to-do app', () => {
  beforeEach(() => {
    // Cypress starts out with a blank slate for each test
    // so we must tell it to visit our website with the `cy.visit()` command.
    // Since we want to visit the same URL at the start of all our tests,
    // we include it in our beforeEach function so that it runs before each test
    cy.visit('http://localhost:8080/todo')
  })

  it('displays two todo items by default', () => {
    // We use the `cy.get()` command to get all elements that match the selector.
    // Then, we use `should` to assert that there are two matched items,
    // which are the two default items.
    cy.get('.todo-list li').should('have.length', 2)

    // We can go even further and check that the default todos each contain
    // the correct text. We use the `first` and `last` functions
    // to get just the first and last matched elements individually,
    // and then perform an assertion with `should`.
    cy.get('.todo-list li').first().should('have.text', 'Pay electric bill')
    cy.get('.todo-list li').last().should('have.text', 'Walk the dog')
  })

  it('can add new todo items', () => {
    // We'll store our item text in a variable so we can reuse it
    const newItem = 'Feed the cat'

    // Let's get the input element and use the `type` command to
    // input our new list item. After typing the content of our item,
    // we need to type the enter key as well in order to submit the input.
    // This input has a data-test attribute so we'll use that to select the
    // element in accordance with best practices:
    // https://on.cypress.io/selecting-elements
    cy.get('[data-test=new-todo]').type(`${newItem}{enter}`)

    // Now that we've typed our new item, let's check that it actually was added to the list.
    // Since it's the newest item, it should exist as the last element in the list.
    // In addition, with the two default items, we should have a total of 3 elements in the list.
    // Since assertions yield the element that was asserted on,
    // we can chain both of these assertions together into a single statement.
    cy.get('.todo-list li')
      .should('have.length', 3)
      .last()
      .should('have.text', newItem)
  })

  it('can check off an item as completed', () => {
    // In addition to using the `get` command to get an element by selector,
    // we can also use the `contains` command to get an element by its contents.
    // However, this will yield the <label>, which is lowest-level element that contains the text.
    // In order to check the item, we'll find the <input> element for this <label>
    // by traversing up the dom to the parent element. From there, we can `find`
    // the child checkbox <input> element and use the `check` command to check it.
    cy.contains('Pay electric bill')
      .parent()
      .find('input[type=checkbox]')
      .check()

    // Now that we've checked the button, we can go ahead and make sure
    // that the list element is now marked as completed.
    // Again we'll use `contains` to find the <label> element and then use the `parents` command
    // to traverse multiple levels up the dom until we find the corresponding <li> element.
    // Once we get that element, we can assert that it has the completed class.
    cy.contains('Pay electric bill')
      .parents('li')
      .should('have.class', 'completed')
    cy.screenshot('todo-1')

  })

  context('with a checked task', () => {
    beforeEach(() => {
      // We'll take the command we used above to check off an element
      // Since we want to perform multiple tests that start with checking
      // one element, we put it in the beforeEach hook
      // so that it runs at the start of every test.
      cy.contains('Pay electric bill')
        .parent()
        .find('input[type=checkbox]')
        .check()
    })

    it('can filter for uncompleted tasks', () => {
      // We'll click on the "active" button in order to
      // display only incomplete items
      cy.contains('Active').click()

      // After filtering, we can assert that there is only the one
      // incomplete item in the list.
      cy.get('.todo-list li')
        .should('have.length', 1)
        .first()
        .should('have.text', 'Walk the dog')

      // For good measure, let's also assert that the task we checked off
      // does not exist on the page.
      cy.contains('Pay electric bill').should('not.exist')
      cy.screenshot('todo-2')

    })

    it('can filter for completed tasks', () => {
      // We can perform similar steps as the test above to ensure
      // that only completed tasks are shown
      cy.contains('Completed').click()

      cy.get('.todo-list li')
        .should('have.length', 1)
        .first()
        .should('have.text', 'Pay electric bill')

      cy.contains('Walk the dog').should('not.exist')
    })

    it('can delete all completed tasks', () => {
      // First, let's click the "Clear completed" button
      // `contains` is actually serving two purposes here.
      // First, it's ensuring that the button exists within the dom.
      // This button only appears when at least one task is checked
      // so this command is implicitly verifying that it does exist.
      // Second, it selects the button so we can click it.
      cy.contains('Clear completed').click()

      // Then we can make sure that there is only one element
      // in the list and our element does not exist
      cy.get('.todo-list li')
        .should('have.length', 1)
        .should('not.have.text', 'Pay electric bill')

      // Finally, make sure that the clear button no longer exists.
      cy.contains('Clear completed').should('not.exist')

      cy.screenshot('todo-3')
    })
  })
})
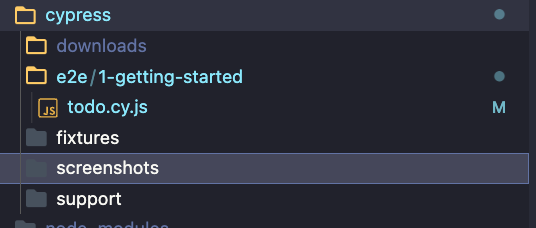
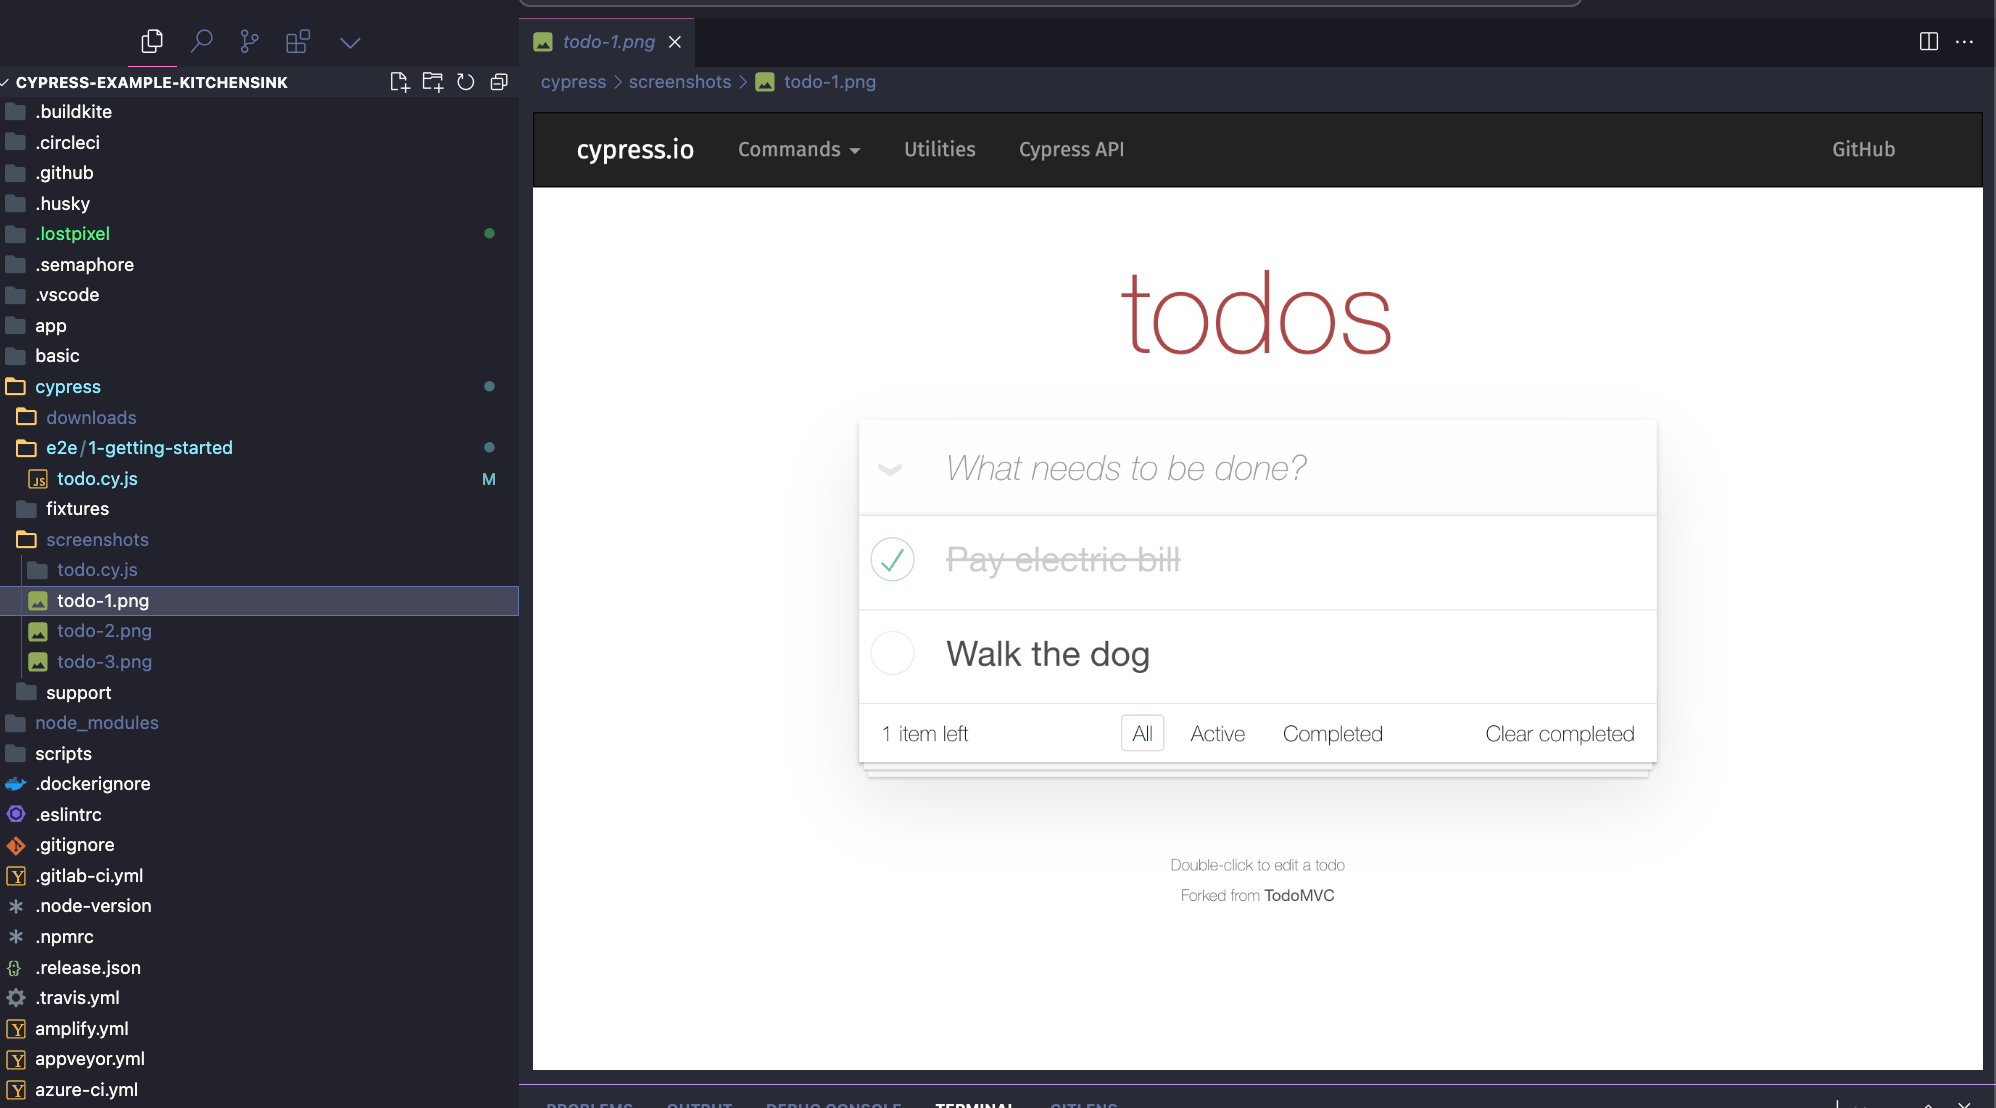
Notice cy.screenshots(todo-1), cy.screenshots(todo-2) & cy.screenshots(todo-3). This will make sure that at some points during E2E tests we will make the screenshots of visual state of the app at that moment.
Running npm run dev and npm run cy:run shall generate the screenshots for us:
One last thing that we need to do is to flatten the structure of the screenshots generated by cypress. Cypress generates all screenshots in deedicated test folders and lost-pixel expects to consume them as a flat structure. Luckily cypress offers nice utility functions to achieve just what we need here, let's modify cypress.config.js:
const { defineConfig } = require('cypress')
const fs = require('fs')
const path = require('path');

module.exports = defineConfig({
  // setupNodeEvents can be defined in either
  // the e2e or component configuration
  e2e: {
    setupNodeEvents(on, config) {
      on('after:screenshot', (details) => {

        // Extract the filename from the original path
        const filename = path.basename(details.path);

        // Define the new path at the top level of the screenshots folder
        const newPath = path.join(config.screenshotsFolder, filename);

        // eslint-disable-next-line no-undef
        return new Promise((resolve, reject) => {
          // Rename (move) the file to the new path
          fs.rename(details.path, newPath, (err) => {
            if (err) return reject(err)

            // Resolve with the new path for accurate results
            resolve({ path: newPath });
          });
        });
      });
    },
  },
})
GitHub Actions setup
We will need to create a workflow file that will alwasy run our application, run cypress tests and than lost-pixel tests:
on: [push]

jobs:
  build:
    runs-on: ubuntu-latest
    name: Lost Pixel

    steps:
      - name: Checkout
        uses: actions/checkout@v3

      - name: Setup Node
        uses: actions/setup-node@v3
        with:
          node-version: 16.x

      - name: Install dependencies
        run: npm install --legacy-peer-deps

      - name: Run app
        run: npm run dev &

      - name: Run Cypress
        run: npm run cy:run

      - name: Lost Pixel
        uses: lost-pixel/[email protected]
This is the whole setup for visual tests! Let's go trough the process of the visual testing flow now!
- Run your app so it is accessible for cypress to be tested
- Define your visual tests inside of cypress tests by simply making the screenshots via
cy.screenshots()(Note: be sure to name them in a unique way) - Run your cypress tests
npm run cy:run - Run
npx lost-pixel docker updateto use all of the freshly genereated image snapshots as baselines - See your tests passing on CI
- When there is an update to UI that is expected, run
npx lost-pixel docker updatelocally and commit images to the repo - Rinse and repeat while catching visual bugs at ease 😎
If you want to run Lost Pixel in a holistic setup for the larger project where you need to add visual tests for your stories, pages and E2E tests - make sure to check the holistic setup guide.

About Dima Ivashchuk
Hey, I'm - Dima the co-founder of Lost Pixel. I like modern frontends, building stuff on the internet, and educating others. I am committed to building the best open-source visual regression testing platform!